
Recomendados
Más contenido relacionado
La actualidad más candente
La actualidad más candente (20)
Similar a SMED Training
Similar a SMED Training (16)
Último
Último (20)
SMED Training
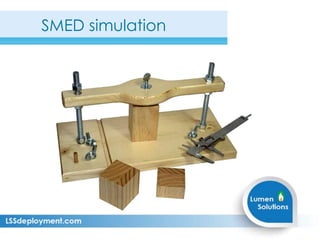
- 2. SMED simulation Purpose: Participants: Duration: Simulates die changeover on a very simple machine with the purpose to teach the 5 steps of SMED (Single Minute Exchange of Dies) At least 3 2-3 hours
- 3. A. 1 wood base: 11 x 5-1/2 inches B. 1 wood crossbar: 11 x 1 inches C. 1wood square die “A”: 3 x 1-1/7 inches D. 1 wood square die “B”: 2 x 1-1/7 inches E. 1 wood square block: 1 x 1-1/7 inches F. 1 round head bolt: 1/4 in - 20 x 2 inches G. 1 t-handle screw: 1/4 in - 20 x 2 inches Components H. 1 thumb screw: 1/4 in – 20 x 1-1/2 inches I. 1 technical measuring set: 6 pieces J. 1 flare nut wrench: 5 pieces L. 2 thread rods: 6 in - 3/8 inches M. 4 wing nuts: 3/8 inches N. 6 hex nuts: 3/8 inches O. 8 flat washers in different sizes A B C D E F GH I J L M N O
- 4. Procedure a. Preparation • Have a chronometer for time measurements • Have a flipchart and post-its to track results during each iteration and include key notes during the simulation • Have the tools over a table
- 5. b. Initial setup Procedure Raw material in production Raw material for next production BaseDie in production Bar Nuts New die for next production Threads Thumb screw
- 6. Procedure c. Alignment requirements Requirement: same distance to these three sides X X X
- 7. Procedure c. Alignment requirements Requirement: 5 mm 5mm
- 8. Rules of the simulation d. Allocate roles to participants The simulation must have at least 3 participants with the following functions: e. Define goals for each step (iterations) In the end of each iteration the group creates suggestions for improvement and evaluation of the cost/benefit. • 1 operator • 1 quality controller • 1 material handler • 1 time keeper/flip chart person • 1 video recording
- 9. SMED simulation steps 1: Measure the actual situation 2: Separate internal and external events 2: Convert internal to external events 3: Reduce internal events 4: Reduce external events