Thoracentesis
•Descargar como PPT, PDF•
191 recomendaciones•130,623 vistas

Thoracentesis is a procedure to drain excess fluid from the pleural space between the lungs and chest wall. It involves inserting a needle through the chest wall under local anesthesia to remove fluid for analysis or to relieve symptoms like shortness of breath. Precautions are taken before and during the procedure to monitor vital signs and breathing. After the procedure, the patient is observed for complications and a chest x-ray may be taken to evaluate the drainage.

Recomendados
Más contenido relacionado
La actualidad más candente
La actualidad más candente (20)
Destacado
Destacado (20)
Similar a Thoracentesis
Similar a Thoracentesis (20)
Más de WahidahPuteriAbah
Más de WahidahPuteriAbah (20)
Último
Último (20)
Thoracentesis
- 1. 1
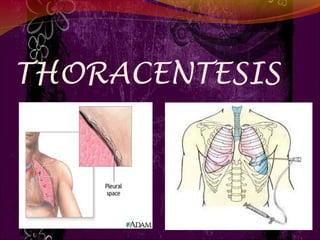
- 2. DEFINITION Thoracentesis is a procedure to remove fluid from the space between the lungs and the chest wall called the pleural space. Thoracentesis is a procedure that removes an abnormal accumulation of fluid or air from the chest through a needle or tube.
- 3. PURPOSE To determine the cause of abnormal accumulation of fluid in the pleural space. Relieve shortness of breath and pain As a diagnostic or treatment procedure To drain large amounts of pleural fluid To equalize pressure on both sides of the thoracic cavity
- 4. INDICATION Traumatic pneumothorax Hemopneumothorax Spontaneous pneumothorax Bronchopleural fistula Pleural effusion
- 5. CONTRAINDICATION An uncooperative patient Coagulation disorder Atelectasis Only one functioning lung Emphysema(pulmonary enlargement) Severe cough or hiccups
- 6. COMPLICATION Pulmonary edema Bleeding Respiratory distress Infection Air embolism Dyspnea and cough Cardiac tamponade(fluid build up in the space Atelectasis(lung between myocardium and collapes) pericardium)
- 7. 7
- 8. BEFORE THE PROCEDURE Explain the purpose, risks/benefits, and steps of the procedure and obtain consent from the patient or appropriate legal design. R: An explanation helps orient the patient to the procedure assist in coping and provide an opportunity to ask question and verbalise anxiety
- 9. CON’T… Take Medical History such as Trouble in breathing, coughing, and hiccups Had heart disease Smoked Travelled to places where may have been exposed to tuberculosis R: to detect any abnormalities regarding the procedure 9
- 10. • Prepare Equipment Dressing set Povidone / Alcohol Abraham’s needle Local anaesthetic, e.g. lignocaine (lidocaine) 1% Connecting tubing or 2% Syringe 50ml and 5ml Formalin bottle Scapel blade and blade 11 Urine bottle x2 Needles (18 and 23 C+S bottle gauge) 3-way stopcock Sterile Glove Fenestrated towel Mask Jug
- 11. BEFORE THE PROCEDURE Check platelet count and/or presence of coagulopathy. If platelet count is < 20,000, or there is known coagulopathy as to whether platelet transfusion or other intervention is needed R: To prevent complication such as bleeding while during procedure.
- 12. Place patient upright / cardiac position and help patient maintain position during procedure. R: the upright position ensures that the diaphragm is more dependent and facilitates the removal of fluid that usually localizes at the base of the chest. Explain that he/she will receive a local anesthetic R: to minimize pain during the procedure. Clean patient skin with antiseptic soap R: To prevent infection and maintain aseptic technique.
- 14. DURING PROCEDURE Observe patient respiration rate and breathing pattern. R: to provide base line data to estimate patient tolerance of procedure Assess patient vital sign such as B/P, pulse R: To prevent any complication such as hypovolemic shock during procedure. Observe patient level of consciousness and give emotional support R: To reduce patient anxiety
- 15. DURING PROCEDURE Monitor saturation R: To prevent hypoxia Inform doctor if any changes of the patient R: To make sure whether need to continue the procedure or stop immediately.
- 16. AFTER PROCEDURE Obtain a chest x-ray to evaluate the fluid level. R: To compare the conditions of the lungs before and after the procedure. For specimen handling, fill the tubes with the required amount of pleural fluid R : To prevent over intake of the fluid to the specimen bottle. Check that each bottle is correctly labelled by checking patient identifiers- full name, date of birth and/or medical record number then send to the lab tests R: To prevent from incorrect results to the patient.
- 17. AFTER PROCEDURE Document the procedure, patient’s response, characteristics of fluid and amount, and patient response to follow-up. R: To develop further treatment to the patient. Provide post-procedural analgesics as needed. R: To prevent patient from pain related to the incision site.
- 18. AFTER PROCEDURE Rest in bed for about 2 hours after the procedure R: To minimize patient activity due to complication such as dyspnea. Blood pressure and breathing will be checked for up to a few hours R: to make sure don't have complications
- 19. AFTER PROCEDURE May remove dressing/bandage another day, or replace it if it becomes soiled or wet R: To prevent from getting infection. Resume patient regular diet. R: To promote wound healing.
- 20. THANK YOU !!!