What is Computer Hardware? Guide to Components & Building a PC
•Descargar como PPT, PDF•
0 recomendaciones•428 vistas

This document provides an overview of computer hardware components and how to build a PC. It defines hardware as the physical parts of a computer including the motherboard, CPU, RAM, graphics card, hard disk, DVD drive, power supply, case, keyboard, mouse and monitor. It then describes the functions of these core components and how they interconnect. The document concludes by outlining the step-by-step process for assembling these hardware parts into a fully functioning computer system, including installing the CPU and RAM into the motherboard, adding the graphics card, connecting power supplies, and setting up input/output devices.

Recomendados
Más contenido relacionado
La actualidad más candente
La actualidad más candente (20)
Destacado
Destacado (15)
Similar a What is Computer Hardware? Guide to Components & Building a PC
Similar a What is Computer Hardware? Guide to Components & Building a PC (20)
Último
Último (20)
What is Computer Hardware? Guide to Components & Building a PC
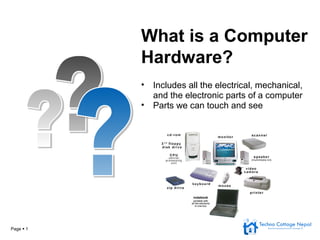
- 1. Page 1 • Includes all the electrical, mechanical, and the electronic parts of a computer • Parts we can touch and see What is a Computer Hardware?
- 2. Page 2 Hardware – Different Types Most Important part of PC Everything is connected to motherboard Printer, TV Card, Mouse, Speaker, etc. Function – Interchange Data & Information. Function – To suppy electrical power Measured in ‘Watt’ Watt – 400W, 500 W Volt – 220V, 240V Function – To process data Input – Processing – Output Brain of the Computer E.g. Pentium III, Core i5, i5, i7 etc. Motherboard Power Supply Unit (PSU) Central Processing Unit (CPU)
- 3. Page 3 Hardware – Different Types Function – To store data temporarily Data only exists until power is supplied Helps to measure the speed of PC E.g. SDRAM, DDR, etc. Function – To display information in the monitor Displays pictures, texts and videos Fitted in AGP/PCI slot in motherboard Also used in Playing PC Games Function – To store data and information Helps to safely store user- created data Data isn’t lost even when computer is switched off Space (GB, TB) – Speed (RPM) Random Access Memory (RAM) Graphics Card Hard Disk
- 4. Page 4 Hardware – Different Types CD/DVD Drive Function – To display and see information found in CDs or DVDs Connected to the motherboard Connected via IDE/SATA cable
- 5. Page 5 Different Sections of a Motherboard
- 6. Page 6 How to build your own PC? Tools Required – 1 Screw Driver Parts: •CPU •Motherboard •Memory •Graphics Card •Sound Card •Hard Disk •DVD Drive •Case •Power Supply Unit •Keyboard •Mouse •Monitor
- 7. Page 7 How to build your own PC? • Install CPU into motherboard • Pull lever of CPU Socket • Put CPU & push until you hear a ‘click’ sound • Install RAM • Spread side lever of memory slot • Install memory into memory slot • Install Graphics Card • Install Graphics Card into AGP/PCI slot • Install CPU Cooler • Install by pushing the cooler lever • Connect fan power pin into ‘CPU Fan’ socket • Place the motherboard in casing • Install mainboard on preinstalled screws Step 1Step 1 Step 2Step 2 Step 3Step 3 Step 4Step 4 Step 5Step 5
- 8. Page 8 How to build your own PC? • Install CD/DVD drives • Install Hard Disk Drives • Connect Main Power Suppy • Connect 12V (small wire) and main power (big wire) from PSU to motherboard • Connect main power suplly cord along with keyboard and mouse • Connect monitor cord (blue) to VGA port • Connect the font button (power, reset) • Connect LED • Connect DVD/HD to motherboard along with other wires • Connect HD/DVD drive to PSU • Connect drives to IDE connector in motherboard Step 6Step 6 Step 7Step 7 Step 8Step 8 Step 9Step 9 Step 10Step 10
- 9. Your Computer is ready! Page 9
- 10. Your Computer is ready! Page 9