Infographic: How to Use a Trinocular Light Microscope

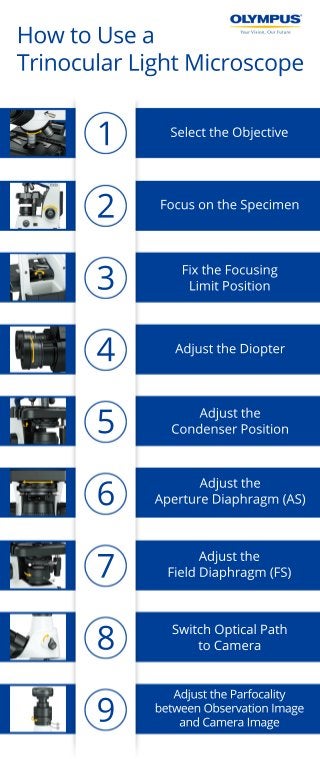
Download this infographic for a step-by-step guide for setting up a trinocular light microscope. 1. Select the Objective Hold the revolving nosepiece and rotate it to select a low magnification objective. 2. Focus on the Specimen Rotate the coarse focusing knob and the fine focusing knob to bring the specimen into sharp focus. 3. Fix the Focusing Limit Position Carefully bring the specimen into focus with the highest magnification objective, and screw the focusing stopper clockwise until it stops. 4. Adjust the Diopter Rotate the diopter adjustment ring on both right and left eyepiece and adjust them to the index 0 position. Select a high magnification objective (e.g. 40x). While looking through the right eyepiece with your right eye, bring the specimen into focus. 5. Adjust the Condenser Position Rotate the condenser height adjustment knob and lift the condenser to the upper limit position. 6. Adjust the Aperture Diaphragm (AS) Move the aperture diaphragm level to match the magnification of the objective in use. 7. Adjust the Field Diaphragm (FS) Select the 10x objective eyepieces and look through the eyepieces. Rotate the field diaphragm ring counterclockwise to close down the field diaphragm so that it comes inside the field of view. Rotate the condenser height adjustment knobs to bring the field diaphragm into focus. Rotate the auxiliary lens centering knobs from both right and left sides to center the field diaphragm image within the field of view. Slowly rotate the field diaphragm ring clockwise to open the field diaphragm. By inscribing the entire field of view, confirm it is centered. Open the field diaphragm slightly until its image circumscribes the field of view. 8. Switch Optical Path to Camera Switch the light path selection knob on the trinocular tube to the camera position. 9. Adjust the Parfocality between Observation Image and Camera Image The parfocality adjustment allows matching of the focus between the observed image and camera image. Using a high magnification objective, bring the specimen into focus. Switch to a low magnification objective, and switch the light path to the camera position. Loosen the clamping screw and LOCK screw. While viewing the camera image on the monitor, hold the top of the camera adapter and turn its bottom to adjust the focus. When the monitor image is focused, tighten the clamping screw and LOCK screw firmly. For more information, visit: http://www.olympus-lifescience.com/en/resources/
Recomendados

Recomendados
Más contenido relacionado
Último
Último (20)
Destacado
Destacado (20)
Infographic: How to Use a Trinocular Light Microscope
- 1. 1 SelecttheObjective FocusontheSpecimen FixtheFocusing LimitPosition AdjusttheDiopter Adjustthe CondenserPosition Adjustthe ApertureDiaphragm (AS) Adjustthe FieldDiaphragm (FS) SwitchOpticalPath toCamera AdjusttheParfocality betweenObservationImage andCameraImage 2 3 4 5 6 7 8 9 HowtoUsea TrinocularLightMicroscope